One important thing when an app is released on the Play Store is to have up-to-date, beautiful and clean screenshots. In an app containing lots of screens, it can be painful to manually take screenshots for each release. This article describes an approach at pushing automation into the screenshot process in order to more easily achieve this.
Just arrived at Capitaine Train, I was asked to find a way to automatically take screenshots because we had a lot of them: 3 form factors, 4 languages, 6 screenshots = 72 screenshots. This article explains the solution we used to achieve this. 3 important parts are necessary to take screenshots like a robot: uiautomator, accessibility and bash scripting.
Hands on uiautomator
uiautomator is a framework used to manipulate the UI from some code encapsulated into a JUnit test case. One important thing to know is that those test cases are executed in a side process: they are not contained inside the tested app. You can see the uiautomator framework as an independent robot which is able to do some actions on a device like touch, scroll, take a screenshot etc.
The basics
Before continuing, the official documentation is a good starting point. I highly encourage you to take some times to read it.
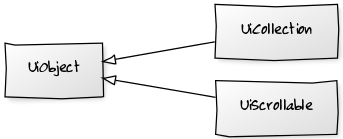
The API is very simple. There are 3 classes that represents 3 types of UI element:
UiObject: a basic UI element such asTextViewUiCollection: a UI element that contains severalUiObjectsuch asLinearLayoutUiScrollable: a UI element that contains severalUiObjectand that can be scrolled such asListView
There are 2 other classes you must know:
UiDeviceto perform device-level actions like pressing the back button, taking a screenshot etcUiSelectorto request UI elements on a screen by id, type etc
Finally, the most important class is UiAutomatorTestCase which is the class to extend from in order to create an uiautomator test case.
You can check out some examples to be more familiar with uiautomator on the official documentation.
Setup, build and run
The next step to use uiautomator is to build it but at this time, there is no official Gradle integration of uiautomator module so you have to deal with it on your own. The final output of uiautomator test cases is single JAR so here is a simple setup.
- Create a new
javaGradle module in your existing project and use the sameandroid.jardependency as in the entire project usinglocal.properties.
1 2 3 4 5 6 7 8 |
|
- Create a new ant build file using
local.propertiesandgradle.propertiesto have the same configuration (target, sdk path) as the whole project
1 2 3 4 5 6 7 |
|
- Build the JAR using ant (don’t use Gradle), push it on the device and run your test case
1 2 3 |
|
Walking through the Settings app
Now, I’m going to explain how to navigate and change items (in particular, switching from one language to another) in the Settings. First, it’s a good way to practice uiautomator. Secondly, it’s one of the keys to automate things. Keep in mind that it’s one way to do it but it’s not the only one and it works on a real device in English(US) with Lollipop 5.0.0
- Open quick settings
1
|
|
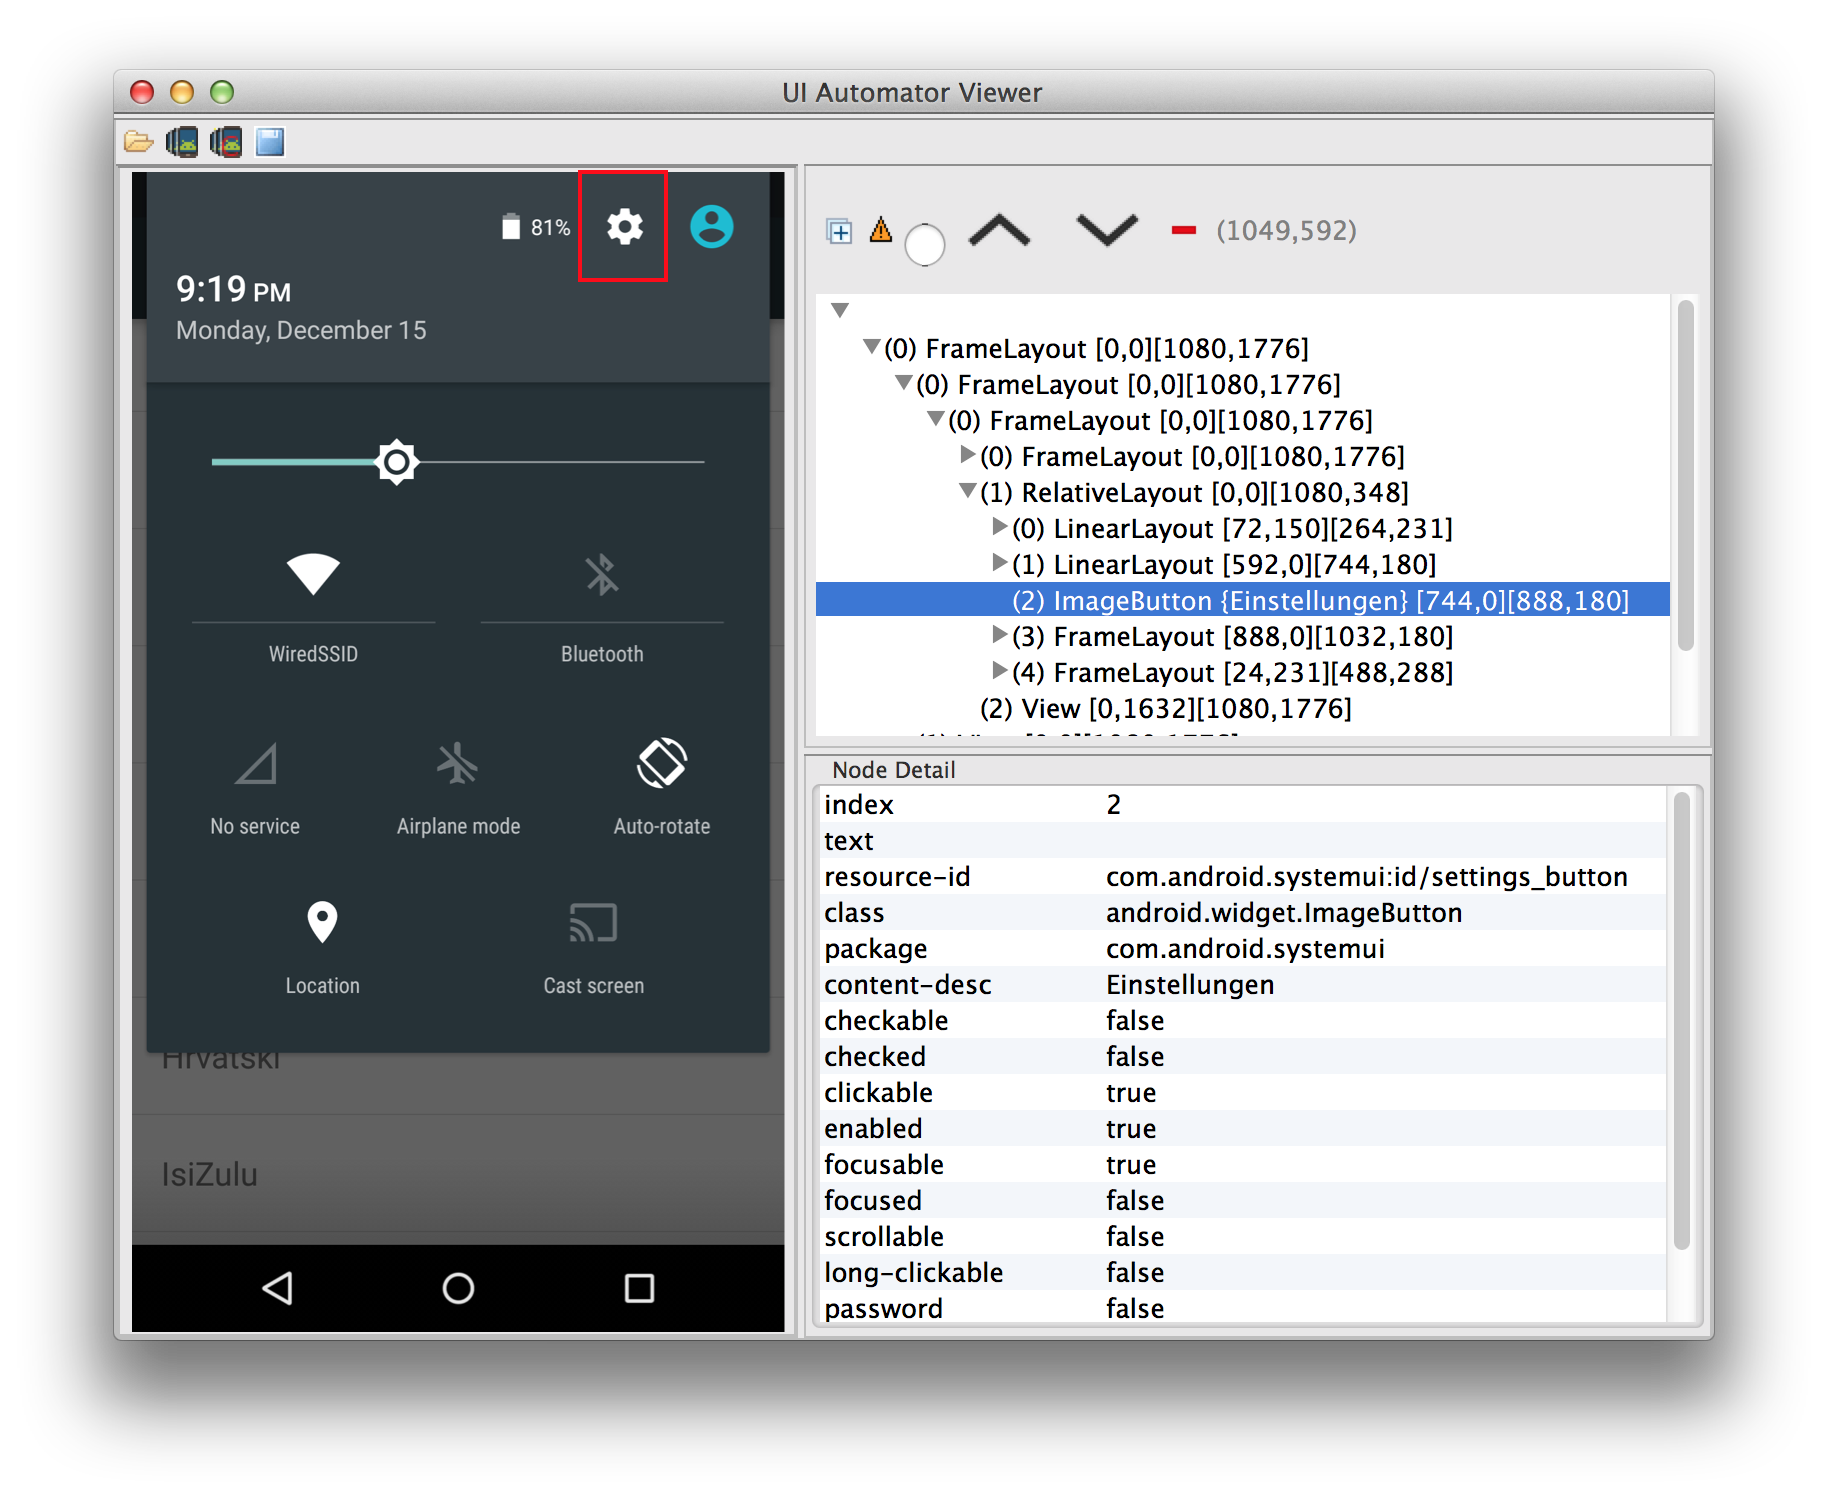
- Click the settings button to open Settings apps
1
|
|
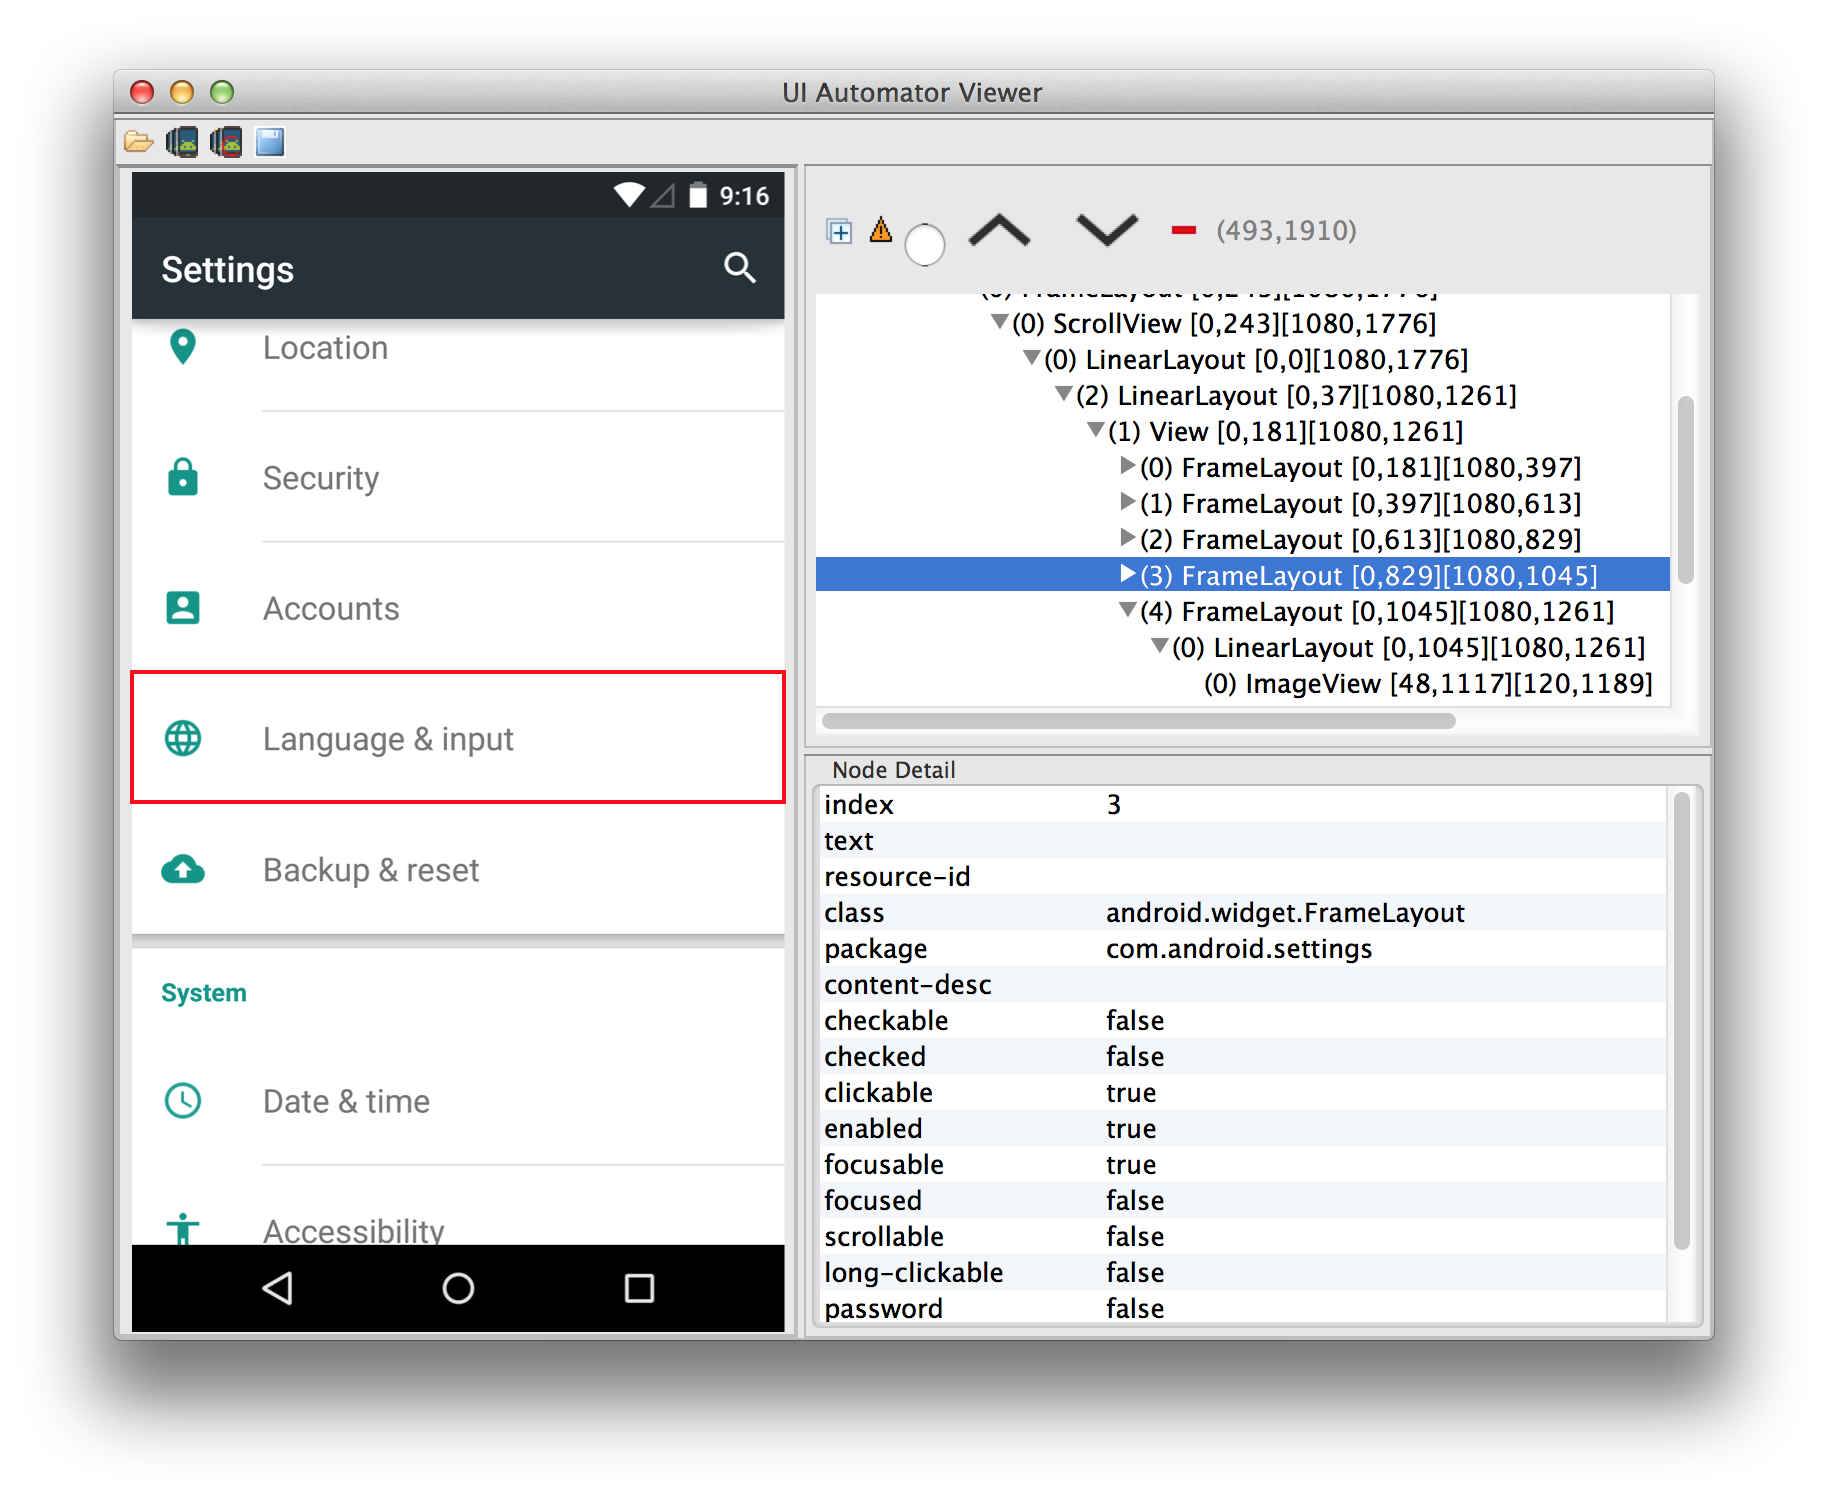
- As there is not any usable view ids in the Settings app, we have to find and click the language item by text. Hence, we scroll to the item (a
FrameLayout) and click on it.
1 2 |
|
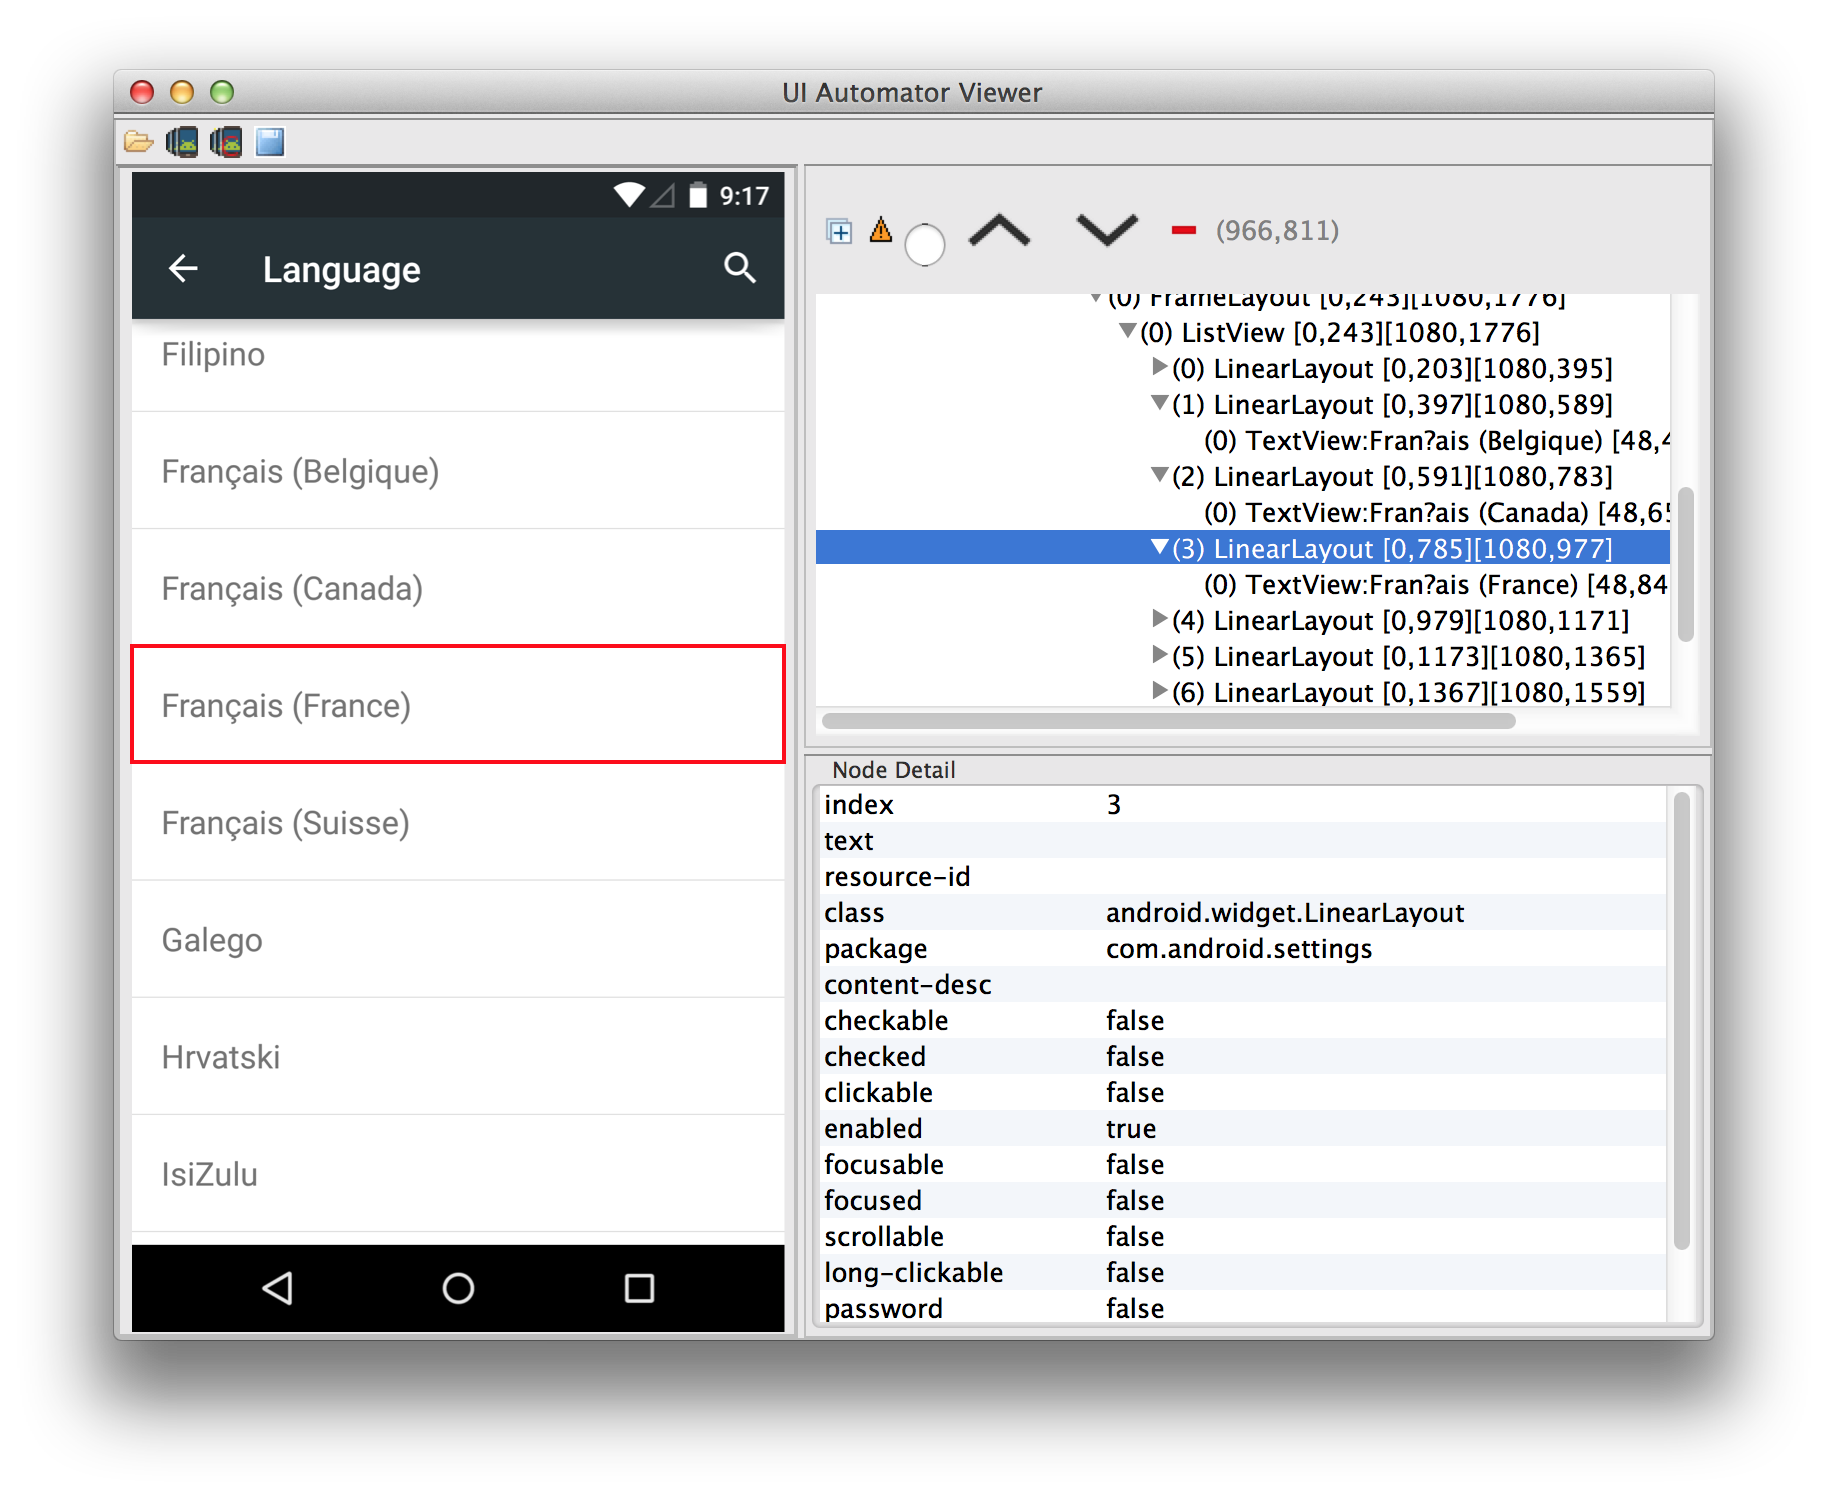
- The exact same “find and click” principle is used on the “Language” item (a
LinearLayout) contained in aListView

1 2 |
|
- Finally, the target language is chosen
1 2 3 |
|
You need to force the new locale to avoid the uiautomator process to keep a cache of some translations.
A few tips
-
DEACTIVATE ALL ANIMATIONS on the device when you’re using uiautomator to ensure stability (you can do it via Settings > Developer options > Window animation|Transition animation|Animator duration scale)
-
Use android.util.Log if you want to log stuff; they appear in logcat so use a specific tag for filtering
-
Use
uiautomatorviewerevery time to dig into the view hierarchy. It will help you to build more accurate selector to target UI elements (theuiautomatorvieweris located insdk/tools/uiautomatorviewer) -
Remember uiautomator test cases are not Android test cases so you have not any
Contextto play with -
Note that you can’t access to your app classes, you can only reference the Android framework classes
-
You can pass parameter from the uiautomator command line to the test case class using
-e key valuein command line andUiAutomatorTestCase.html#getParams()in the test case classe.
Switch from one language to another in the same test case without any manual human interaction is simple, isn’t it !? uiautomator is a great tool but it doesn’t help much if your app is not accessible enough. Sometimes, it is required to create completely custom views and problems may arise.
Making a custom view accessible
Accessibility is an important feature for an app for two main reasons. First, some people requires it (too many developers unfortunately forget it). Secondly, all of the uiautomator tooling is based on accessibility.
When developing on Android, you most of the time have nothing in particular to make your app accessible. Indeed, standard framework components like TextView, ListView, etc. already deal with accessibility. However, there are some certain cases where you have to do a little more work. This is mainly when using custom views.
In the Capitaine Train app, we built a custom view when designing the calendar. It is based on a ListView filled with several custom views each of them representing a month (MonthView). A MonthView is a pure View i.e. it directly extends from View and have no children. As a consequence, everything (days, selector, etc.) is drawn manually in the onDraw(Canvas) method. Because of it, MonthView is not accessible at all by default and so is the whole calendar.
The first thing to do is really simple. It consists of setting a content description for each month using the View#setContentDescription method. It will help us scroll the ListView to a particular month.
Then, once the ListView is positioned on a given month, we want to be able to touch a precise day. In order to do that, we need to make the MonthView content accessible. The Android support library offers a useful helper in that matter: ExploreByTouchHelper. As a MonthView is not a tree of views, the technique involves creating a fake logical tree of views based on touch responsiveness.
Implement ExploreByTouchHelper for your custom view
There are 4 methods to implement:
getVirtualViewAt(float x, float y)
Return the virtual view id at this x and y or ExploreByTouchHelper.INVALID_ID if there is no virtual view
getVisibleVirtualViews(List<Integer> virtualViewIds)
Fill the virtualViewIds with all virtual view ids in the custom view
onPopulateEventForVirtualView(int virtualViewId, AccessibilityEvent event)
Fill the accessibility even with virtual view information such as text or content description
onPopulateNodeForVirtualView(int virtualViewId, AccessibilityNodeInfo node)
Fill the accessibility node with the virtual view id informations such as text, content description, class name, bounds in parent. If there are possible interactions with this virtual view, you have to specify it on the accessibility node.
onPerformActionForVirtualView(int virtualViewId, int action, Bundle arguments)
Perform an action (specified in the previous method) on virtual view
How to make ExploreByTouchHelper implementation easier:
- create a
VirtualViewclass to maintain virtual view informations such as id, text, content description, bounds in parent. - use a list of
VirtualViewin your custom view. Initialize it as soon as possible and update virtual views on drawing pass
1 2 3 4 5 6 7 8 9 10 11 12 13 14 15 16 17 18 19 20 21 22 23 24 25 26 27 28 29 30 31 32 33 34 35 36 37 38 39 40 41 42 43 44 |
|
Use the helper in your custom view
- implement
dispatchHoverEvent(MotionEvent event)to activate touch exploration - we need
setAccessibilityDelegate()method to re-set the delegate after eachListView.getViewbecause of this (If your custom view is not used in aListViewjust set the delegate in the constructor)
1 2 3 4 5 6 7 8 9 10 11 12 13 14 15 16 17 18 19 20 21 |
|
Use uiautmatorviewer to check your implementation
If everything is ok, when your take a screenshot using the uiautmatorviewer tool, you should see the fake hierarchy of views with all of the provided informations set in accessibility nodes.
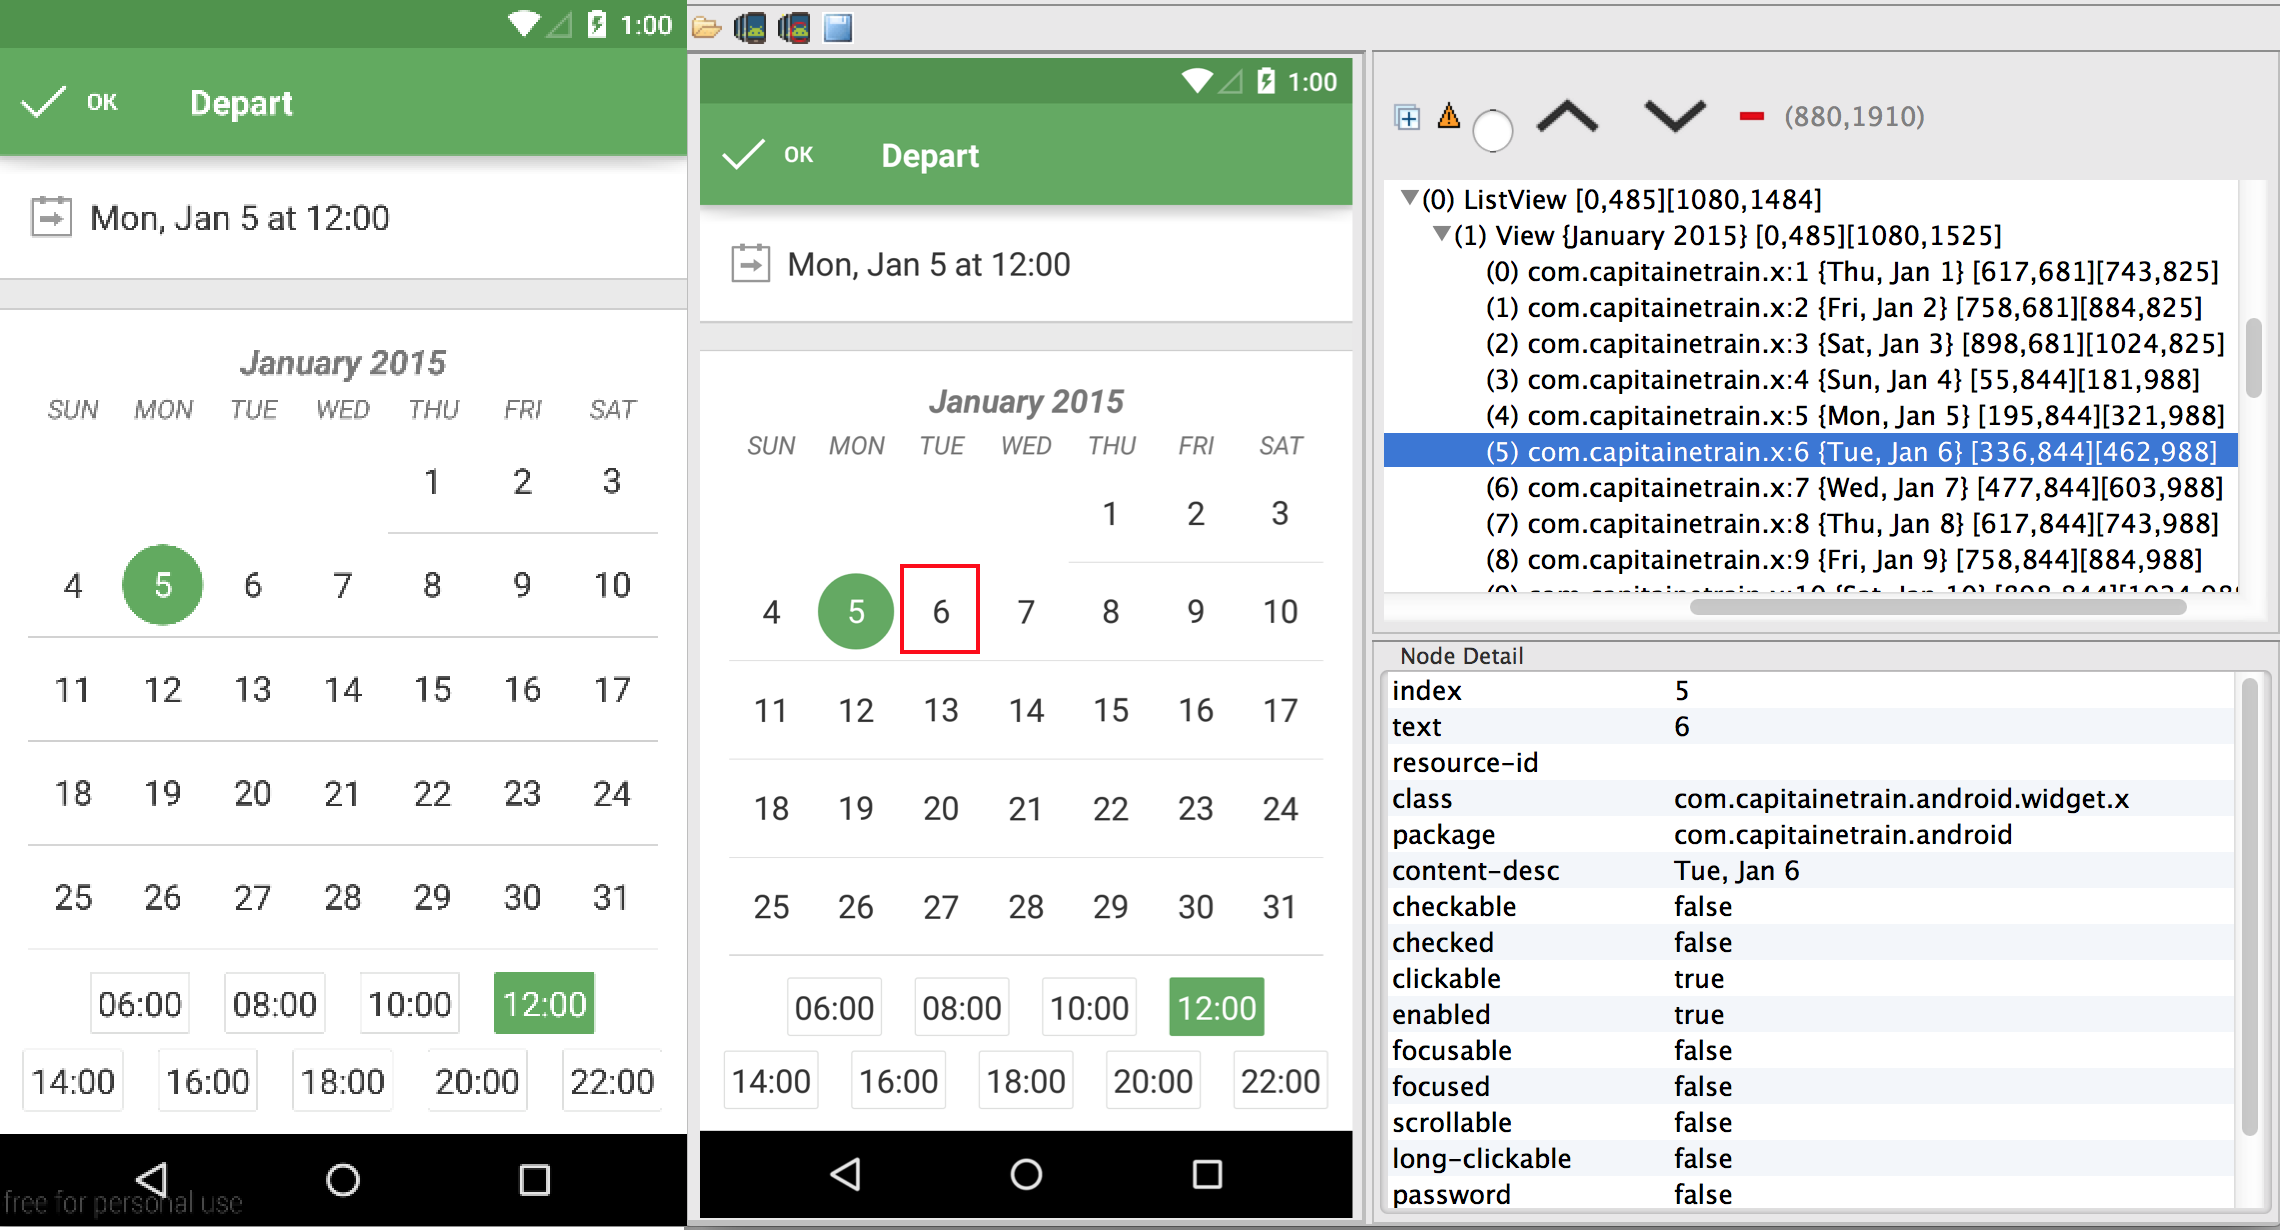
On a side note, I just found a problem in Capitaine Train’s app while writing this blog post. The class name on each virtual view is com.capitainetrain.x because we forgot Proguard :)
Now, all of the app is accessible and, as a direct consequence, uiautomator usable, let’s automatically take some beautiful screenshots like a boss.
Taking beautiful screenshots
The final part of this article explains how to push uiautomator to the next level to take polished screenshots of your app in multiple languages. It consists in 2 steps: first, use bash scripting to run your uiautomator screenshot test case as many times as you want and polish those screenshots using imagemagick.
First thing to do is to build and push the uiautomator JAR, and then run the test case. As you know how to switch from one language to another inside a test case, you can pass 2 arguments to the test case: the current language to go through the Settings app and the new target language to switch on.
1 2 3 4 5 6 7 8 |
|
Let’s say we have a simple test case which switches language, opens an app and takes a screenshot.
1 2 3 4 5 6 7 8 9 10 11 12 13 14 15 16 |
|
-
switchLanguage(String,String)can be easily implemented using the method I explained in the “Hands on uiautomator” part. -
openApp()is explained here -
takeScreenshot()usesUiDevice#takeScreenshot. Just a small tip: if an app contains scrollable parts, we have to wait for a short period time (withUiAutomatorTestCase.sleeporSystemClock.sleep) until scrollbars disappear else they will be visible on your final screenshots.
Now screenshots are stored on the device, we only need to pull them.
1 2 |
|
Run the test case on multiple languages. It starts from a given current language of the device because there is not a proper way to get it programmatically and then it runs the test case for each language.
1 2 3 4 5 6 7 8 9 10 11 12 |
|
The app can be uninstalled/installed for each uiautomator test case run to start the test in the same conditions (i.e. from scratch) every time.
1 2 3 4 5 6 7 8 9 10 11 12 13 |
|
Finally, all things together.
1 2 3 4 5 6 7 8 9 10 11 12 13 14 15 16 17 18 19 20 21 22 23 24 25 26 27 28 29 |
|
Screenshot polishing
Good read: Creating professional looking screenshots
Your app screenshots must be as polished as possible because it’s the first thing the user look at on the Play Store. Most of the time, the user doesn’t read an app description but goes straight to your app’s screenshots. There is no need to say the best the screenshot experience is, the better. A great way to ensure this is to follow some simple rules:
- Always have a clean status bar
- Remove navigation bar
- Bundle several screen sizes: 5, 7, 9|10
The 2 first points can be easily achieved with an amazing tool called: imagemagick. The official documentation is very large so we are going to focus on 2 features: composite and convert.
Clean the status bar with composite
composite is used to overlap one image over another. It’s perfect to put a clean status bar on top of a screenshot.
1
|
|
Crop the navigation bar with convert
convert is used to convert between image formats as well as crop an image. It’s perfect to remove the navigation bar on bottom of a screenshot.
1
|
|
144 is the size in px of the navigation bar on a Nexus 5.
Conclusion
Since the introduction of this new automatic screenshot tooling at Capitaine Train, 20~30min were spend on taking screenshots while it was sometimes taking us half a day or almost a day before (i.e. nobody wanted to do that and screenshots were almost never updated). The save in time is clearly huge and significant and clearly worth the time spent at developing the tool. In addition to that, it is less error-prone and less painful.
Some of the possible next steps are:
- Use the Google Play Publishing API to easily upload the generated screenshots
- Integrate this tool into Jenkins to take screenshots on each release build