Flavien Laurent

Personal blog on programming | mainly Android, Java

ViewOverlay: When, How and for What Purpose?

In Android 4.3, a new feature for developer has been added: Overlays. When announcing this feature, the first thing I did was looking at the source code to understand how it works. Right after, I tried to find good use cases to fully exploit the potential of this feature. So in this post, I’m going to tell you more about this useful feature.

Obviously, you must install the following apk on Android 4.3

Download Sample Application

Overlays, how it works ?

In a few words

The official documentation about overlays is quite clear and you should read it. For more details, you can read this Chet Haase’s post.

Important points to remember about overlays:

  • two types of overlays : ViewOverlay (for Views) and ViewGroupOverlay (for ViewGroups)
  • two methods to retrieve a view overlay : View.getViewOverlay / ViewGroup.getViewGroupOverlay
  • you can add/remove a drawable in ViewOverlay and ViewGroupOverlay
  • you can add/remove a view in ViewGroupOverlay
  • the documentation says An overlay [...] on top of a View [...] drawn after all other content in that view [...]
  • Chet Haase’s said [...] you are responsible for positioning/sizing the views/drawables where you want them in the overlay [...]

Reading the source code

Let’s start by looking at the View.getViewOverlay/ View.getViewGroupOverlay methods.

1
2
3
4
5
6
7
8
9
10
11
12
13
public ViewOverlay getOverlay() {
    if (mOverlay == null) {
        mOverlay = new ViewOverlay(mContext, this);
    }
    return mOverlay;
}

public ViewGroupOverlay getOverlay() {
    if (mOverlay == null) {
        mOverlay = new ViewGroupOverlay(mContext, this);
    }
    return (ViewGroupOverlay) mOverlay;
}

A ViewOverlay/ViewGroupOverlay is created when the get method is called.

How ViewOverlay/ViewGroupOverlay works? Note that a ViewGroupOverlay extends ViewOverlay, so we can focus on the ViewOverlay implementation

ViewOverlay.java

ViewOverlay implementation is based on a OverlayViewGroup (static inner class in ViewOverlay). The OverlayViewGroup extends ViewGroup and contains a list of drawables. As you can see, there isn’t any method to layout drawables or child views that’s why you are responsible for positioning/sizing them.

Two more interesting things :

  1. the documentation says view will be repositioned such that it is in the same relative location inside the activity.
OverlayViewGroup.add(View child)
1
2
3
4
5
6
int[] parentLocation = new int[2];
int[] hostViewLocation = new int[2];
parent.getLocationOnScreen(parentLocation);
mHostView.getLocationOnScreen(hostViewLocation);
child.offsetLeftAndRight(parentLocation[0] - hostViewLocation[0]);
child.offsetTopAndBottom(parentLocation[1] - hostViewLocation[1]);
  1. all invalidation calls on a OverlayViewGroup are forwarded to its host view because the overlay is not a child of the host view and invalidation cannot therefore follow the normal path up through the parent hierarchy
1
2
3
4
5
6
7
8
9
10
11
12
13
14
15
16
17
18
19
20
21
22
23
24
25
@Override
public void invalidate(Rect dirty) {
    super.invalidate(dirty);
    if (mHostView != null) {
        mHostView.invalidate(dirty);
    }
}

@Override
public void invalidate(int l, int t, int r, int b) {
    super.invalidate(l, t, r, b);
    if (mHostView != null) {
        mHostView.invalidate(l, t, r, b);
    }
}

@Override
public void invalidate() {
    super.invalidate();
    if (mHostView != null) {
        mHostView.invalidate();
    }
}

[...]

Two real use cases

I underlined the word real because I didn’t want to explain you how to use Overlay with irrelevant examples. That’s why, I’m going to present you two problems solved thanks to Overlays : a button with a banner and how to animate a view deletion.

A button with a banner (ViewOverlay)

Here we want to add a banner with some text on top-right corner of a button as you can see below.

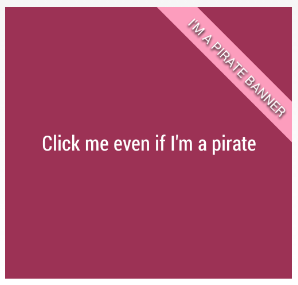
The main difficulty is that we don’t want the button’s behaviour to be changed by the banner (i.e. click, touch etc.).

A basic xml layout

Here we have a basic layout with one button.

1
2
3
4
5
6
7
8
9
10
11
12
13
14
15
16
<RelativeLayout
xmlns:android="http://schemas.android.com/apk/res/android"
android:layout_width="match_parent"
android:layout_height="match_parent">

<Button
android:id="@+id/button"
android:text="Click me even if I'm a pirate"
android:background="@drawable/badged"
android:layout_width="250dp"
android:layout_height="250dp"
android:textColor="#FFF"
android:fontFamily="sans-serif-condensed"
android:layout_centerHorizontal="true"/>

</RelativeLayout>

A custom banner drawable

For more flexibility (change the banner color, text etc), you have to implement a custom drawable in order to draw a banner.

I’m not gonna explain how to draw a banner because this is not the main purpose of this post. If you have questions, don’t hesitate to ask me. So, here is the custom drawable.

1
2
3
4
5
6
7
8
9
10
11
12
13
14
15
16
17
18
19
20
21
22
23
24
25
26
27
28
29
30
31
32
33
34
35
36
37
38
39
40
41
42
43
44
45
46
47
48
49
50
51
52
53
54
55
56
57
58
59
60
61
62
63
64
65
66
67
68
69
70
71
72
73
74
75
76
77
78
79
80
81
82
83
class BannerDrawable extends Drawable {

private static final double SQRT_2 = Math.sqrt(2);
private final Rect mTextBounds;
private Paint mPaintFill;
private Paint mPaintText;
private String mMessage = "I'M A PIRATE BANNER";
private int mBannerWidth = 50;
private int mTextSize;

public BannerDrawable() {
  initPaintFill();
  initPaintText();
  mTextBounds = new Rect();
}

private void initPaintFill() {
  mPaintFill = new Paint(ANTI_ALIAS_FLAG);
  mPaintFill.setStyle(Paint.Style.FILL);
  mPaintFill.setColor(getResources().getColor(R.color.banner));
}

private void initPaintText() {
  mPaintText = new Paint(ANTI_ALIAS_FLAG);
  mPaintText.setStyle(Paint.Style.FILL);
  mPaintText.setColor(Color.WHITE);
  mPaintText.setTextSize(20);
  mPaintText.setShadowLayer(4.0f, 2.0f, 2.0f, Color.BLACK);
}

@Override
public void draw(Canvas canvas) {
  Rect bounds = getBounds();
            if (bounds.isEmpty()) {
                bounds = canvas.getClipBounds();
            }
            float width = bounds.width();

            adaptTextSize((int) (width * 0.9), (int) (mBannerWidth * 0.9));

            float bannerHyp = (float) (mBannerWidth * SQRT_2);

            canvas.translate(0, bounds.centerY() - mBannerWidth);
            canvas.rotate(45, bounds.centerX(), bounds.centerY() - mBannerWidth);
            canvas.drawRect(bounds.left - bannerHyp, bounds.top, bounds.right + bannerHyp, bounds.top + mBannerWidth, mPaintFill);

            canvas.drawText(mMessage, bounds.centerX() - mTextBounds.centerX(), mBannerWidth / 2 + mTextBounds.height() / 2, mPaintText);
}

private void adaptTextSize(float width, int height) {
  if (mTextSize > 0) {
      mPaintText.setTextSize(mTextSize);
      return;
  }
  int textSize = 10;
  int textHeight;
  int textWidth;
  boolean stop = false;
  while (!stop) {
      mTextSize = textSize++;
      mPaintText.setTextSize(mTextSize);
      mPaintText.getTextBounds(mMessage, 0, mMessage.length(), mTextBounds);

      textHeight = mTextBounds.height();
      textWidth = mTextBounds.width();

      stop = textHeight >= height || textWidth >= width;
  }
}

@Override
public void setAlpha(int alpha) {
}

@Override
public void setColorFilter(ColorFilter cf) {
}

@Override
public int getOpacity() {
  return PixelFormat.OPAQUE;
}
}

Finally, use a ViewOverlay

This last step is quite simple. It consists in sizing and positioning a BannerDrawable and to add it to the button’s ViewOverlay when the button has been fully laid out.

Note that the drawable bounds is the top right square of the button.

1
2
3
4
5
6
7
8
9
10
11
final View button = findViewById(R.id.button);
final ViewOverlay overlay = button.getOverlay();
final BannerDrawable bannerDrawable = new BannerDrawable();
button.post(new Runnable() {
  @Override
  public void run() {
      //top right square
      bannerDrawable.setBounds(button.getWidth() / 2, 0, button.getWidth(), button.getHeight() / 2);
      overlay.add(bannerDrawable);
  }
});

This is piece of cake, isn’t it ?

Animating a view deletion (ViewGroupOverlay)

This second use case is a bit more complicated. We’re gonna animate the deletion of a view (i.e. Button) in a parent (i.e. LinearLayout) with a eyecatching approach.

If you still have not understand the use case I want to explain to you, you can take a look on the animated gif below.

Step1: fill the parent

Assume that we have an xml layout with an empty LinearLayout (id=buttons) inside a ScrollView. We create 10 buttons inside the LinearLayout:

onCreate()
1
2
3
4
5
6
7
8
9
10
11
12
13
14
15
16
17
18
19
20
for(int i=0; i<10; i++) {
final Button button = new Button(this);
[... customize the button ...]

buttons.addView(button, params);

button.setOnClickListener(new View.OnClickListener() {
  @Override
  public void onClick(View v) {
      Toast.makeText(AnimActivity.this, "You click on a button", Toast.LENGTH_SHORT).show();
  }
});
button.setOnLongClickListener(new View.OnLongClickListener() {
  @Override
  public boolean onLongClick(View v) {
      animatedDelete(button);
      return true;
  }
});
}

Each button show a toast onClick and is deleted onLongClick.

Step2: animate the deletion

On delete, we scale up the button and decrease the alpha property. To achieve that, we use multiple ObjectAnimators played together thanks to an AnimatorSet.

Before starting the animation, don’t forget to add the button to the ViewGroupOverlay of the top parent (i.e. the activity main view) in order not to clip the button in the ViewGroupOverlay by its direct parent (i.e. LinearLayout).

Finally, when the animation ends or is cancelled, remove the button from the ViewGroupOverlay.

It gives us the following method

animatedDelete(Button)
1
2
3
4
5
6
7
8
9
10
11
12
13
14
15
16
17
private void animatedDelete(final Button button) {
final ViewGroupOverlay viewGroupOverlay = ((ViewGroup) findViewById(android.R.id.content)).getOverlay();
viewGroupOverlay.add(button);
AnimatorSet set = new AnimatorSet();
set.playTogether(
      ObjectAnimator.ofFloat(button, "scaleX", 1, 3f),
      ObjectAnimator.ofFloat(button, "scaleY", 1, 3f),
      ObjectAnimator.ofFloat(button, "alpha", 1, 0.0f)
);
set.start();
set.addListener(new AnimatorListenerAdapter() {
  @Override
  public void onAnimationEnd(Animator animation) {
      viewGroupOverlay.remove(button);
  }
});
}

And this is it!

Conclusion

I’ve shown you two real examples where using Overlay is clearly an appropriated method. The only serious disadvantage is that Overlays are only available since API level 18.

Comments