Back in May 2013, everyone has discovered the beautiful action bar effect in the Play Music app (explained by Cyril Mottier , Pushing the ActionBar to the Next Level). This effect is really a great way to make the ActionBar a reactive part of the UI.
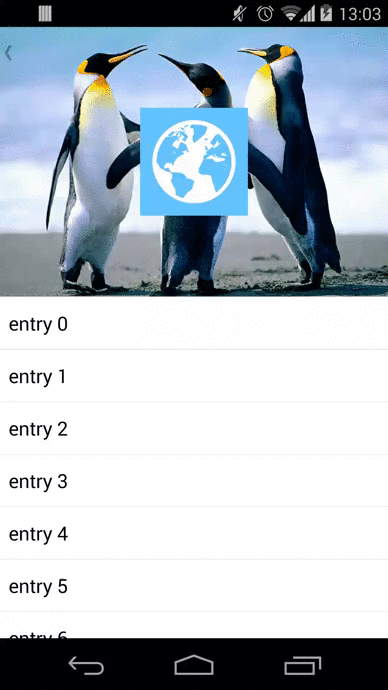
Yesterday, I discovered the new Newsstand app which introduced a new way to push the ActionBar to the next level. If you open the edition screen, you’ll notice the ActionBar is transparent (without icon) and overlaps a large images set (overlaped by the big magazine icon) describing some news. Once you start scrolling down, the big magazine icon is translated and scaled to match the ActionBar icon.
Here it’s a short demo of the trick
The main advantage is to make the ActionBar real part of the content.
In this article, I’m going to explain how to make the whole edition screen (the ActionBar effect and the Ken Burns animation). I will deep dive into the details of implementing the ActionBar effect. As a bonus, I will explain how to create a view animated with the Ken Burns effect.
You can download & install the sample application.
The ActionBar trick
Styles
The first step is to setup styles to:
- have a transparent ActionBar
- enable overlay mode
1 2 3 4 5 6 7 8 9 10 11 12 13 14 15 16 17 18 |
|
Layout structure
The layout structure is really important. The main layout is a FrameLayout composed by a ListView and another FrameLayout (ie header). The header contains one ImageView (ie header_picture) which is the picture and one ImageView (ie header_logo) which is the icon to be translated & scaled into the ActionBar.
1 2 3 4 5 6 7 8 9 10 11 12 13 14 15 16 17 18 19 20 21 22 23 24 25 26 27 28 29 30 31 |
|
The trick here is to add an fake header view in the ListView. This fake header must have the same height as the real header. You can use a layout xml file to describe the fake header
1 2 3 4 5 6 |
|
Then, you just have to inflate & add it by code
1 2 |
|
Get the scroll position
I’m not going to explain this in details because there is a bunch of StackOverflow, posts etc about it.
1 2 3 4 5 6 7 8 9 10 11 12 13 14 15 16 |
|
Notice that you have to take care of the ListView header height in the calculation if the first visible position is >= 1.
Translating the header
On ListView scroll, you have to tranlate the header in order to follow the ListView fake header. Notice that the translation must be bounded to the ActionBar height.
1 2 3 4 5 6 7 8 9 10 11 12 |
|
Fading the title
You need to retrieve the title View to apply a fade effect. This view can be retrieve using the Resources.getIdentifier method.
1 2 3 4 |
|
Then, just initialize alpha value on this View
1
|
|
On ListView scroll, you have to fade the title depending on the header translation ratio
1 2 3 4 5 6 7 8 9 10 11 12 |
|
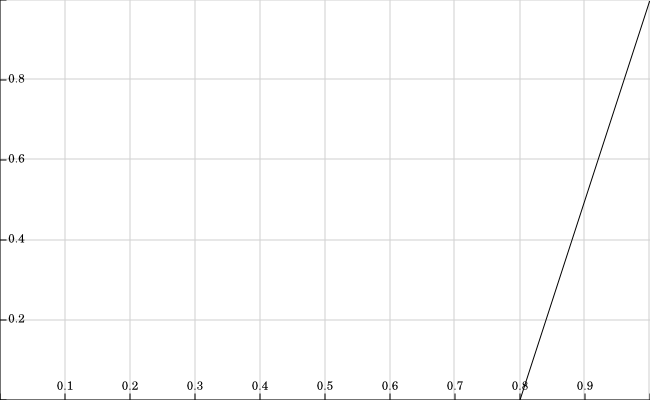
Alpha values: f(x) = 5x-4
The clamp method is basic Math method (see Wikipedia)
1 2 3 |
|
First, we don’t need to get the ActionBar title view reference anymore. We are going to use a SpannableString with a custom ForegroundColorSpan. We need a custom ForegroundColorSpan to be able to set the color alpha.
1
2
3
4
5
6
7
8
9
10
11
12
13
14
15
16
17
18
19
20
21
22
23
24
25
26
27
public class AlphaForegroundColorSpan extends ForegroundColorSpan {

    private float mAlpha;

    public AlphaForegroundColorSpan(int color) {
        super(color);
        }
        […]

        @Override
        public void updateDrawState(TextPaint ds) {
                ds.setColor(getAlphaColor());
        }

    public void setAlpha(float alpha) {
        mAlpha = alpha;
    }

    public float getAlpha() {
        return mAlpha;
    }

    private int getAlphaColor() {
        int foregroundColor = getForegroundColor();
        return Color.argb((int) (mAlpha * 255), Color.red(foregroundColor), Color.green(foregroundColor), Color.blue(foregroundColor));
    }
}
On ListView scroll, we set the alpha value on the AlphaForegroundColorSpan object and finally call ActionBar#setTitle to refresh the title view. Notice that you must keep the same AlphaForegroundColorSpan and SpannableString instances for performance (avoiding GC).
1
2
3
4
5
6
7
8
9
10
11
12
13
14
15
16
17
18
mListView.setOnScrollListener(new AbsListView.OnScrollListener() {
        @Override
        public void onScrollStateChanged(AbsListView view, int scrollState) {
        }

        @Override
        public void onScroll(AbsListView view, int firstVisibleItem, int visibleItemCount, int totalItemCount) {
            float ratio = clamp(mHeader.getTranslationY() / mMinHeaderTranslation, 0.0f, 1.0f);
            //actionbar title alpha
            setTitleAlpha(clamp(5.0F * ratio - 4.0F, 0.0F, 1.0F));
        }
    });

private void setTitleAlpha(float alpha) {
        mAlphaForegroundColorSpan.setAlpha(alpha);
        mSpannableString.setSpan(mAlphaForegroundColorSpan, 0, mSpannableString.length(), Spannable.SPAN_EXCLUSIVE_EXCLUSIVE);
        getActionBar().setTitle(mSpannableString);
    }
Thanks to Cyril Mottier for pointing this out. It’s a very elegant solution!
Moving & scaling the icon
You need to retrieve the icon View to make a translation. This view can be retrieve using the classical findById method.
1
2
3
private ImageView getActionBarIconView() {
    return (ImageView) findViewById(android.R.id.home);
}
Then, set a transparent icon on the ActionBar
1
2
ActionBar actionBar = getActionBar();
actionBar.setIcon(R.drawable.ic_transparent);
On ListView scroll, you have to move & scale depending on the header translation ratio. The main principle is to make a “diff” between the transparent (i.e. invisible) ActionBar icon view and the header logo view. This “diff” is calculated using the Rect on screen of the 2 views and results in scaleX, scaleY, translationX and translationY values. Finally, those values are used to translate and scale the header logo view until it matches the transparent ActionBar icon view.
1
2
3
4
5
6
7
8
9
10
11
12
13
14
15
16
17
18
19
20
21
22
23
24
25
26
27
28
mListView.setOnScrollListener(new AbsListView.OnScrollListener() {
        @Override
        public void onScrollStateChanged(AbsListView view, int scrollState) {
        }

        @Override
        public void onScroll(AbsListView view, int firstVisibleItem, int visibleItemCount, int totalItemCount) {
            float ratio = clamp(mHeader.getTranslationY() / mMinHeaderTranslation, 0.0f, 1.0f);
            //move & scale

            interpolation = mAccelerateDecelerateInterpolator.getInterpolation(ratio);

            View actionBarIconView = getActionBarIconView();

            getOnScreenRect(mRect1, mHeaderLogo);
            getOnScreenRect(mRect2, actionBarIconView);

            float scaleX = 1.0F + interpolation  (mRect2.width() / mRect1.width() - 1.0F);
            float scaleY = 1.0F + interpolation  (mRect2.height() / mRect1.height() - 1.0F);
            float translationX = 0.5F  (interpolation  (mRect2.left + mRect2.right - mRect1.left - mRect1.right));
            float translationY = 0.5F  (interpolation  (mRect2.top + mRect2.bottom - mRect1.top - mRect1.bottom));

            mHeaderLogo.setTranslationX(translationX);
            mHeaderLogo.setTranslationY(translationY - mHeader.getTranslationY());
            mHeaderLogo.setScaleX(scaleX);
            mHeaderLogo.setScaleY(scaleY);
        }
    });
Notice that you can use an AccelerateDecelerateInterpolator on the ratio to make this animation smoother
BONUS: Ken Burns animation
Currently working on this part. The code is already available KenBurnsView.java
Conclusion
As it’s said here, it’s always (with a few different details) the same trick called synchronized scrolling. The true genius of this effect is to have thought about it!