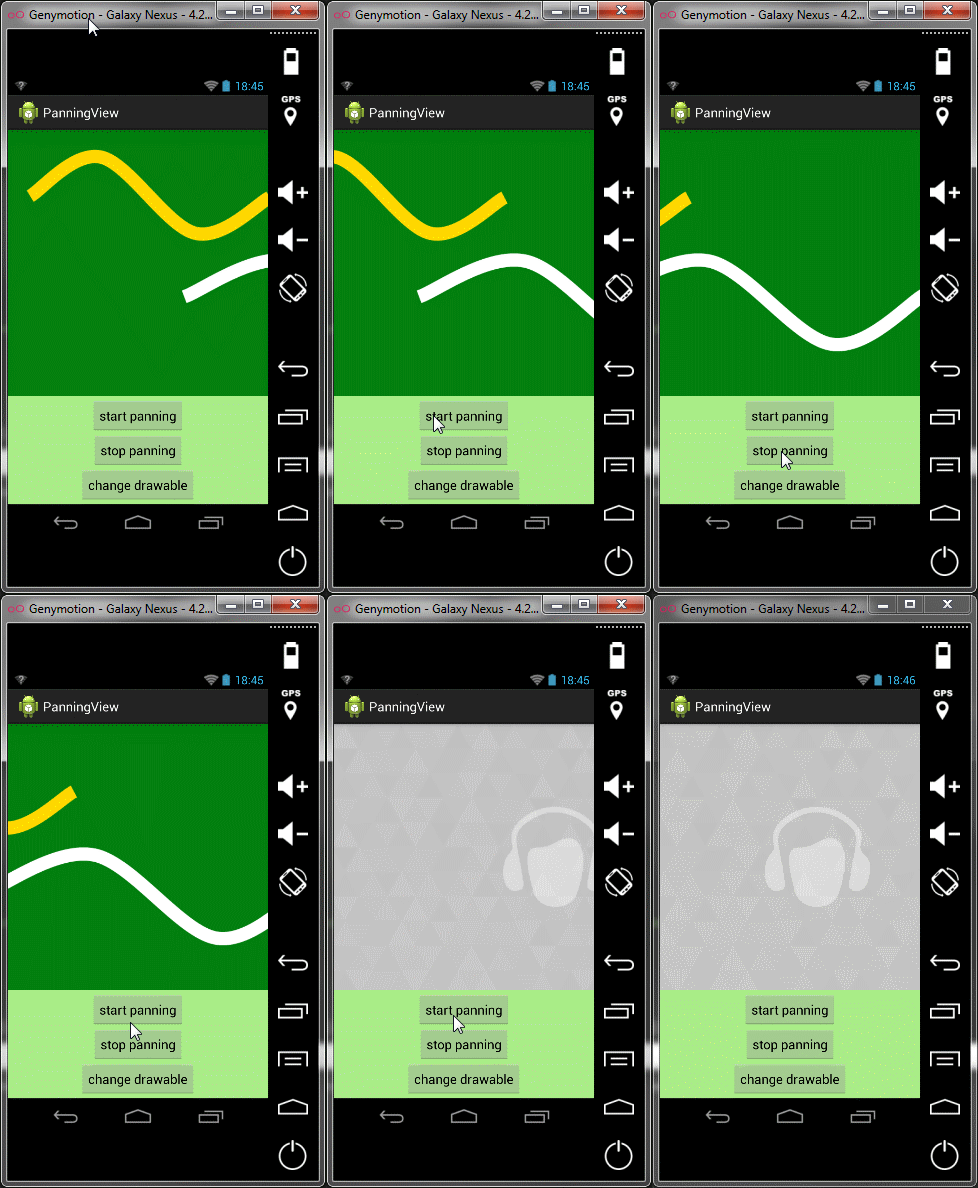
After the Google I/O keynote 2013, like many of you, I’ve received an update of the Play Music app. I think that it’s one of the most beautiful and well-made application of Google. This app contains lots of animations, effects and good ux patterns to reproduce. In this first article, I want to talk specifically about the animated background in the now playing screen.
If you start to play a song, you’re going to see the album cover moving slowly (from right to left to right in portrait and from bottom to top to bottom in landscape). This animation is visually simple but it’s kind of tricky.
If you still have not understand the animation I want to explain to you, you can take a look on the animated gif below or simply download & install the sample application.

Playing with setImageMatrix
Deep in the framework
Here is the offical documentation for ImageView.setImageMatrix

As you can see, this is a short explaination. Basically, it replaces the matrix of the ImageView (set identity matrix if null is passed). Then, two methods are called: configureBounds and invalidate.
- configureBounds: according to the
scaleType, the drawable is bounded and/or the draw matrix is modified. For example, inCENTER_CROPmode, the draw matrix is scaled and translated. InMATRIXmode, the draw matrix is only assigned to the matrix of the ImageView. - invalidate (i.e.
onDraw): the only interesting thing is that the draw matrix (if not null) is concatenated with the canvas
Let’s play
If you want the ImageView to be drawn fully respecting your matrix, don’t forget to set the MATRIX scaleType.
1
|
|
1
|
|
Here is the ImageView with the original matrix:

Scale (factor 2 on x and y)
1 2 3 |
|

Scale and rotate (15°)
1 2 3 4 |
|

Scale and translate (the most interesting for us)
1 2 3 4 |
|

Make your background moving
There are three phases to achieve in order to make your background moving:
- scale to fit the container
- animate the background by doing some translations
- loop this animation
Last thing that you must know, we’re gonna work with this background image:

Step1: scale to fit
This step is the easiest one. All you have to do is just to calculate the scale factor between the container size (i.e. the ImageView) and the drawable intrinsic size according to the current orientation and keeping the ratio:
- portrait, the drawable must be scaled to use all the available height
- landscape, the drawable must be scale to use all the available width.
Suppose we are in portrait mode, the ImageView has a drawable and ImageView is fully laid out.
1 2 |
|
… which gives us the following result: as you can see, the drawable top and bottom fit the top and bottom container.

Step2: animate your background
For this step, we’re gonna use a powerfull concept of the Android animation framework: ValueAnimator.
Don’t forget to read all the provided documentation about this class.
The principle is to make your background moving on the x axis by applying some translations on the ImageView matrix.
Remember that all the matrix operations are post|preconcatenated. You can read a good explaination in here.
1 2 3 4 5 6 7 8 9 10 11 12 13 14 |
|
There is probably (for sure) a better way to those operations on the matrix. Please tell me how?
Step3: where to stop and how to loop
The last step consists in:
- stopping the animation to constantly match the real drawable bounds
To do that, you’ll need a RectF to maintain the real size and position of the background. Whenever you change the matrix, you must update the rect using the mapRect(RectF rect)) function.
1 2 |
|
- reverse the animation when the translation is complete (i.e. a drawable bound is reached)
This part is a piece of cake. You have to keep a variable for the current direction and to configure the ValueAnimator from/to values in order to make the right animation.
1 2 3 4 5 |
|
All together
1 2 3 4 5 6 7 8 9 10 11 12 13 14 15 16 17 18 19 20 21 22 23 24 25 26 27 28 29 30 31 32 33 34 35 36 37 38 39 40 41 42 43 44 45 46 47 48 49 50 51 52 53 54 55 56 57 58 59 60 61 62 63 64 65 66 67 68 69 70 71 72 73 |
|
Optimizations
Thanks to Romain Guy for his remarks.
As he said to me, we have to avoid boxing in the ValueAnimator described in the step2 (animate your background). If you don’t know why we have to avoid boxing, you should look at those slides by Cyril Mottier.
One solution is to use an ObjectAnimator on a wrapped ImageView in order to forward changes on the real ImageView.
Here is a draft for this optimization
1 2 3 4 5 6 7 8 9 10 11 12 13 14 15 16 17 18 19 20 21 22 23 24 25 26 27 28 29 30 31 32 33 34 35 |
|
Secondly, another way to deal with matrix when drawing a bitmap is to create a simple View (extending View) and to implement onDraw(Canvas) calling drawBitmap (Bitmap bitmap, Matrix matrix, Paint paint) method.
Conclusion
This article reflects in part the implementation of PanningView library available on Github. Anyway feel free to correct me if my approach sounds kind of wrong or if you see a problem somewhere.